Blog: Resident Evil 7 House Recreation
- Jack Stevenson
- Sep 13, 2025
- 10 min read

Updated: Jan 10
Spring 2025
Resident Evil Recreation: Final Result
May 13, 2025
Over the course of 5 weeks, my group (Joseph Acuna, Daniel Bocanegra, Ismael Diaz Jr) and I worked on recreating the Resident Evil 7 Baker House. The Baker House is where a large portion of Resident Evil 7 takes place, where the player is forced to investigate the abandoned home after his girlfriend goes missing. It's a damp and eerily quiet environment, with sludge and mold plastering walls and plates. We did our best to replicate these attributes in the Unity engine.


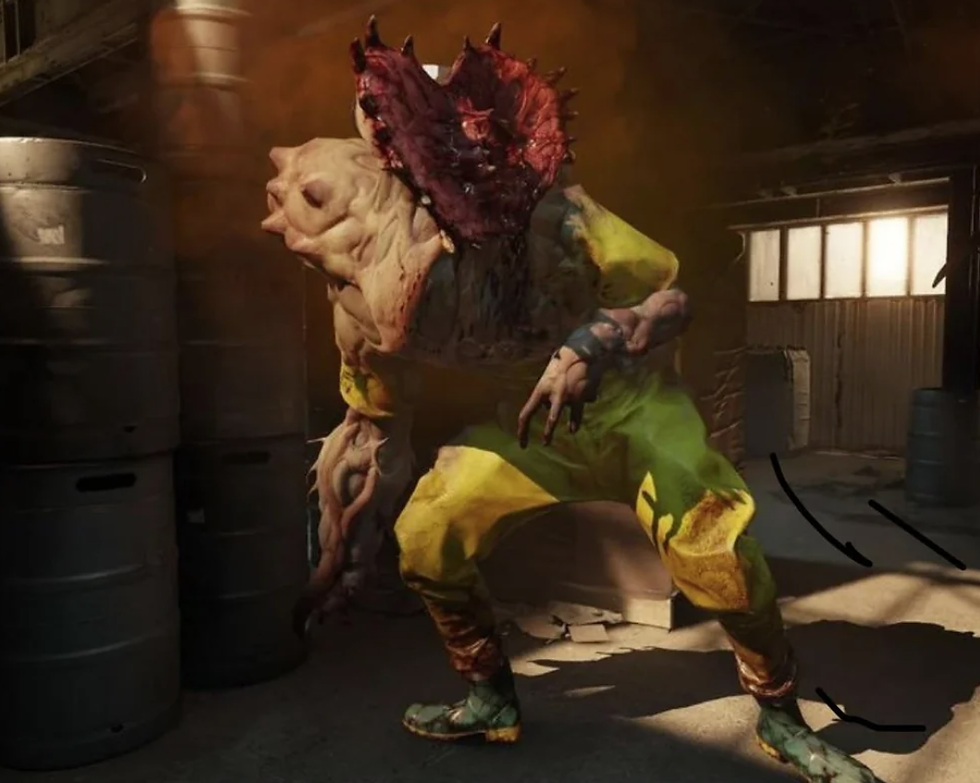
I was the primary coder for this project, but I also modeled the crate enemy. I was responsible for developing the game’s systems, including an Inventory, Weapons, Unlockables, and an Enemy.


For the enemy, I wanted to focus on a character like the Molded rather than Jack Baker, since Jack would have been much harder to create. I thought it’d be fun to create an enemy based on the 230 crate since Cody has lamented about it multiple times.

As I developed the enemy, I also got the idea to integrate elements from Half Life Alyx’s ‘Jeff’ such as his sound effects and having ‘ears like Mozart’ so to speak. Unlike Jeff, though, the monster can still see to make them much more intimidating.
While developing the systems for this game. I faced a couple of challenges along the way. A big problem that I ran into fairly early on was with handling the placement of inventory icons. I had a system that originally relied on layout components to keep the UI elements neatly organized, but I needed to create a custom approach when I wanted to make the UI elements move smoothly. This required a fair bit of trial and error as I wasn't very familiar with RectTransforms and how coordinates are handled in canvas-space. Eventually, though, I was able to figure out the proper way to move UI elements by reading Unity's documentation and their online help forums.
Another issue I faced was that the crate monster's movement would often desync with its animations. I'm not super proud of the solution I implemented, where the animator and navigation logic depend on one another closely, but I think the solution worked well enough for me to not worry about it. If I was to expand this project, I would likely implement a more robust system to handle enemy logic in general.
Looking back, I've learned a lot about how to work better as a team. My teammates and I got better at communicating our progress and emphasizing what we needed from each other. I personally got better at gauging how long creating a program or system might take me, which I would say is an immensely useful skill to have. I might try to continue refining this game so it looks better on my portfolio, but I'm still extremely happy with how our work as a team came together to form this well-crafted experience.
Resident Evil Recreation: Sprint 5
May 8, 2024
For the 5th and final sprint of our CAGD 373 final, I worked on adding sound effects to many items in the game. I also worked on making the audio automatically muffle when it doesn't have line of sight to the player.
For the sound effects, I made a custom script to handle playing audio. This script would be placed on every audio source and would contain a list of audio clips that would be played at random when the script is told to play a sound. This helps to reduce repetition for sound effects such as footsteps or collision effects. I also made a script that automatically plays sound effects when their collider physically hit something in order to make them livelier. I made sure to add a minimum force threshold to ensure the audio sources weren't constantly playing.
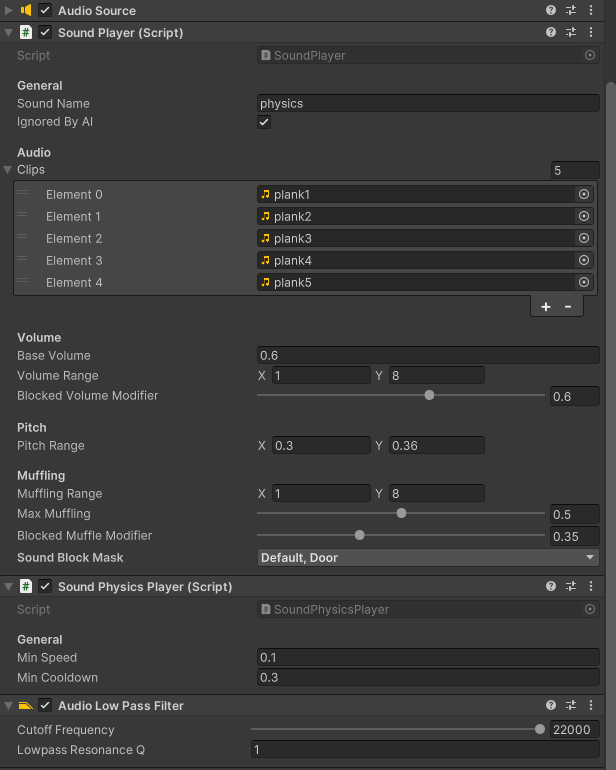
For the muffling effect, I had to put a lot of time into properly implementing it in a way that wouldn't be too hard on performance. I ended up having the script perform a raycast every Fixed Update between the audio player and the player character, where the raycast was made to ignore objects such as items and the player's collider. I experimented with making the audio source only update if the player or audio source moves far enough from their last checked positions, but that unfortunately didn't work with large objects that moved between the player and audio, like doors.
There are still a few more things that I'll need to do before our project can be submitted. The lighting still needs to be fully baked and some of my partner's assets still need to be implemented into the scene. However, I'm more than confident that we can do it by the end of the week, as we've been able to keep a good work ethic throughout the entire project.
Resident Evil Recreation: Sprint 4
May 1, 2024
For the 4th sprint of our CAGD 373 final, I worked on refining existing systems and incorporating the last major systems to our game. I added an inventory inspection system, inventory management, gun particles, bullet holes, and animations for the gun.
The inventory inspection system took a bit more time than I anticipated it to. This was mainly due to how I needed to spawn an entirely new item separately from the picked up one. That way, I could render it on top of the whole screen without it being occluded, thanks to the Custom Pass Volume component. I'll definitely make use of the pass volume in future projects, as it's super handy!
For inventory item placement, all of the functions for it were mostly already in place. I just needed to properly implement the keyboard functionality and make the UI elements move in a more satisfying way. Unfortunately, though, the gliding effect caused some weird issues to arise when resizing the screen during runtime. This took me a few hours to try and find a solution for, and frankly the solution is okay at best. However, I doubt this would be an issue that most players would run into, so I held off from spending more time on it to focus on more important features.
Decals were pretty fun to dive my head into. I made good use of Unity's node-based shader graph to make the bullet decals more dynamic. I wanted it so that the dirt around the bullet hole wouldn't permeate through the surface it hit, while still having the hole go through. To do this, I made a custom depth texture for the decal, which tells the decal projector how deep each part of the decal should go. In retrospect, I could have just used 2 separate decal projectors to get a similar effect, but this way allows me to have much more control over how it looks.

Finally, I spent the rest of my time adding some particle effects to the gun. Instead of the default Shuriken particle system, I used the Visual Effect Graph package for these effects. It's much lighter on performance and allows for a node-based workflow to create particles. One drawback to the VFX graph is that they lack proper collision detection, unlike the Shuriken system. For my use case, though, that wasn't an issue. I also added a reload animation to make the gun feel more alive.
For our final sprint, I'm going to work with my team to add all of the assets they've compiled into the Unity scene and finalize our game. I've already started working on sound, so I'll have plenty of time to refine the overall experience once I've completed that.
Resident Evil Recreation: Sprint 3
April 24, 2024
For the 3rd sprint of our CAGD 373 final, I focused my energy towards revamping the equipment system. This was done so that melee weapons could be picked up and used properly alongside guns and other equipment. I also modeled and textured a crate!
To add this new melee system, I needed to rework a large portion of the code for handling the currently equipped weapon. This code was originally tailored for use with guns exclusively, resulting in the equipment handler script performing a lot of logic that the gun script should have been doing. To remedy this, I made a base 'ItemHolder' class that other item types (GunHolder, MeleeHolder, etc) will inherit from. This 'ItemHolder' class stores a reference to the base 'Item' ScriptableObject, as well as some virtual methods that classes inheriting from the 'ItemHolder' can override.
For the melee system itself, I added a 'sweeping' mechanic rather than just a single raycast. This makes the action of swinging feel more consistent with the visual animation, as multiple raycasts are performed each physics frame between where the melee was and where it is that frame. I also added a tracking system to ensure that larger objects couldn't be hit multiple times in a single swing.

Moving on, I really wanted to emphasize that the crate I was making wasn't the "230 Crate" that my teacher despised. I made the crate out of a variety of different parts that each had their own individual LODs. This way, the box could come apart naturally when struck by a gun or melee. However, I felt as if this wasn't enough to differentiate it from the "230 Crate." To remedy this, I made a custom sign to show the user that this in-fact not a "230 Crate."
I likely put way more effort into this sign than I needed to, but it led me down a fun route of learning about the NFPA sign system. It was interesting to learn what each of the color quadrants represented and how they were supposed to be interpreted. I was also able to add my own 'Specific Hazard' in the white quadrant, which I used to demonstrate that this crate is NOT a '230 Crate'.


I also added an obstacle to our game, but that's unrelated. :)

For our next sprint, I'm going to finish up the inventory system's functionality. I'm going to add a system for swapping items in the inventory UI, a system for inspecting items, and fix up any other loose ends. I also plan on adding sounds & starting to incorporate my team's models into the scene.
Resident Evil Recreation: Sprint 2
April 17, 2024
For the 2nd sprint of our CAGD 373 final, my group and I continued to work on the foundation of our Resident Evil 7 remake. For this, my teammates worked on many of the modular pieces and props for the house, modeling and texturing them with high fidelity. I, on the other hand, was in charge of implementing inventory functionality, a flashlight system, an interaction/lock system, and inventory icons.
The icons were fairly easy to implement. I found some creative commons icons to start with and adjusted them to fit my needs. I also created many new icons for more specific purposes, like the inventory slot icons & circles.

For the inventory system, I standardized the item system to make it easier to implement new items. Weapons, items, medical supplies, keys, and so on can now be managed by the same system, allowing for seamless plug-and-play style development going forward. I also added a simple flashlight system that allows you to toggle a headlamp if you have at least 1 flashlight item in your inventory.


Finally, I added an unlockable door through the interaction system that I had created. Since it required a lot of new subsystems (different inventory states, standardized way to consume item from the slot the cursor is over, etc.), this took me the longest out of the systems that I had worked on this sprint. I also had to spend a lot of time tuning the door physics/responsiveness itself to emulate how it worked in Resident Evil 7 (auto-opening, player collision, auto-closing, door peeking, etc).

In the end, I'm really happy with how all of these new systems came together. While there are a few things that I would like to refine, I'm going to save that for later. As a programmer, I think it's very important to focus on making stable, non-buggy systems before I work on improving how they look. Trying to beautify a system when it's not yet done or when other systems are yet to be made often results in having to backtrack on a lot of your work. It also increases the likelihood of bugs manifesting. It's ok if what you're working on looks rough around the edges at first; what's important is laying a solid foundation to then later perfect.
Resident Evil Recreation: Sprint 1
April 10, 2024 For our CAGD 373 final, my group and I were required to pick a game scene to replicate in Unity with the High-Definition Render Pipeline. We floated around a few ideas that we thought could be fun to replicate, but we ultimately decided to recreate a portion of the Baker House from Resident Evil 7. We decided to go with this scene because of the graphical fidelity that the HDRP allows for in Unity, and it would make sense for us to replicate something that could make the most out of the HDRP's capabilities. For the sake of time, however, we decided to only do a portion of the house.


The 4 of us each had our own role. I was in charge of programming the scene's functionality. After setting up the Unity project and GitHub repository, I wanted to make my testing scene look a bit more like the game itself. I spent some time making a cloudy, dark skybox that closely resembles Resident Evil 7's. I also made use of a custom sprite for the moon. I didn't want to speed too much time on this, though, so I simply settled for a fairly close approximation of the in-game sky.


Beyond that, I also started work on the player controller, player inventory, items, and UI systems. While the player controller was pretty easy to make similar to the game, the inventory and UI systems took a lot more time. I decided to decouple the inventory and display logic from one another to create a straightforward form-follows-function system, where the inventory script has complete control over its state and the interface logic simply displays that state. This helps to consolidate the system into only a few scripts. I also started to make the gun system, but there needs to be a few more tweaks before the player can actually fire their firearm.

For next sprint, I plan on finishing the gun-inventory compatibility and add some more QoL functions, like swapping the positions of items in the inventory. I also plan on adding destructible objects and interactable objects, such as doors or buttons.


