Blog: Escape The Devil's Saloon Game
- Jack Stevenson
- Sep 14, 2025
- 20 min read

Updated: Jan 10
The Devil's Saloon: Sprint 6
November 23, 2025
Sprint 6 was the last full sprint my team and I had for developing our game. With time constraints in mind, we were forced to scrap some planned features from our game and instead pivot towards refining what we have. I focused my time towards refining our game's visual elements through the creation of shaders and visual effects, such as running blood, explosions, post processing, and so on.
The first visual element I worked on this sprint was a vertex painting shader. In Unreal Engine 5, there is a tool that allows developers to paint the vertices of meshes in a scene. This tool is frequently used by professional developers to create what are essentially omni-materials, allowing a single material to dynamically blend between multiple textures by using vertex colors as control weights. This allows developers to reduce texture repetition, create multiple unique surfaces, and quickly paint textures all through the same material.
To accomplish this, I made a shader with a total of 10 texture inputs: 5 textures for albedo, and 5 textures for height. Since our game is going for a retro aesthetic, I didn't need to make use of any mask textures. The shader starts by blending 2 albedo textures based on their heightmaps, the vertex's red channel at that point, and a few other configurable parameters. This allows textures to 'bleed' into others dynamically, like sand pouring into the cracks of a wood floor. The result of this blend is then blended with the next albedo texture through the same process but instead with the vertex color's green channel. This repeats with the vertex color's blue and alpha channels until all 5 albedo channels are blended together.
The shader's ability to blend between 5 textures at the same time gives each material instance considerable flexibility in how it can be used to decorate a level. The use of a single material instance for an entire area as opposed to 5 (or even more) separate shaders can also help with performance and shader compilation time by reducing the total number of shaders in the scene. However, this comes with the drawback of having to sample 10 different textures per pixel. If we had more time to develop our game, I would likely make the shader have the ability to only take 2, 3, or 4 albedo/height texture combos instead of always using 5.


Next, I spent my time creating a universal explosion effect using Unreal Engine 5's Niagara particle system. This was important to get right, as this effect will be widely used throughout our game and must be configurable in size to accommodate for different circumstances. Since our game is a retro boomer shooter, I decided to base the explosion off of Ultrakill's explosion effect, as it was only made of 3 primary components (shockwave, outer smoke, and inner fire) and would fit our game's aesthetic.
This was my first time working with Unreal Engine 5's Niagara particle system. To me, it felt like Unity's older Shuriken particle system but with considerably more features. While I personally prefer Unity's newer VFX Graph to Unreal Engine's Niagara, it was easy to pick up nonetheless. After creating a low poly sphere and ring in Maya, I was able to put together the core elements of the effect. However, some problems arose that I had to dedicate time to addressing.
It took me a second to realize the explosion's fireball in Ultrakill had a scrolling texture. I also noticed that the outer smoke sphere had a bit of a Fresnel effect on the rim, making it stand out more at the smoke sphere's edges. To implement these, I made a generic particle shader that had support for both scrolling textures and a Fresnel scalar. This Fresnel scalar could influence both the particle's opacity and color, with its influence on each being configurable.

I also ended up having to make an inverted sphere model for both the smoke and fireball. The projectiles being transparent caused issues with the rendering order of faces when double-sided shading was enabled, which I needed to make the effect visible while inside of it. Having the sphere's inverted faces on a separate mesh let me slightly offset the inverted mesh's z-test position, fixing the issue.


With the explosion effect done, I pivoted towards the blood flow shader. I realized that I could reuse a lot of the generic projectile shader's logic, as the blood flow effect was primarily a scrolling texture. After pasting the code into the blood flow shader, I added a scrolling distortion effect to the blood's primary texture. This made the blood look like it was bubbling and oozing as it flowed down, making it feel more unnerving and 'alive' so to speak.

Finally, I developed a post-processing shader for our game to make it feel more in-line with our game's retro aesthetic. In the 1990's, VGA cables, the most popular video cable of the time, only supported 256 unique colors per pixel with a 320x200 resolution (in Mode 13h, the standard for games). This limitation, along with the weaker hardware of the time, is what caused older games to be pixelated and have very prominent color banding.
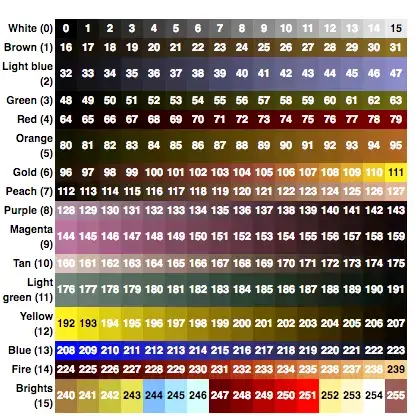
I was able to achieve this retro aesthetic through 3 steps: pixelation, post-process color banding, and post-process dithering. Pixelation is achieved by disabling Unreal Engine's upscaling and then lowering the render resolution to 50%. This gives a distinctly sharp, pixelated image without blurriness. Color banding and dithering are then performed by the post-process shader. Together, the effects help to give our game a distinct appearance compared to other Unreal Engine 5 games.

For our final sprint, I will make the remaining visual effects for our game (particles, decals, shaders, etc.) to make the game world feel more responsive to the player. My teammates are going to be focusing on finishing the level decoration and tidying up some bugs we found during playtesting. As things are wrapping up, I am really excited to see how our game comes out after the months of work we put into it.
Escape The Devil's Saloon: Sprint 5
November 9, 2025
For sprint 5, I spent the majority of my time overhauling our game's projectile base and consolidate logic from child projectiles into the parent blueprint. The new base projectile is now more modular and organized, uses colliders and sweep casts to prevent unintended 'nudging,' optimized to reuse functions and macros where possible, and is easier to expand upon through inheritance. I was also able to rig our game's skull enemy and implement an enemy projectile with a much wider hitbox than by default.
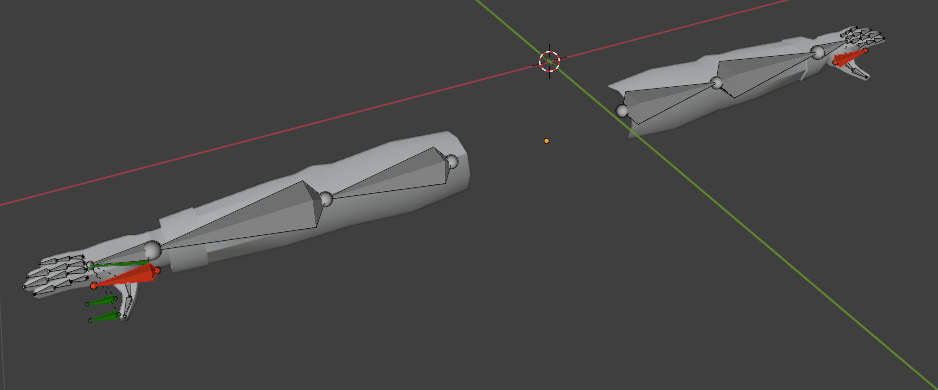
I started the sprint by working on our flying skull enemy's rig. This was prioritized so that another member of our team could quickly start work on the flying skull's animation. I also thought it would be ideal to get out of the way first, since I expected it to be a fairly simple rig.
When I first got my hands on the model, there were a few issues with its normals and smoothing. Some of the mesh's normals pointed away from where they were supposed to, and the smoothing was rather inconsistent. I spent some time fixing up the base model and making adjustments where I saw fit while maintaining the mesh's UVs. After that, I created a simple two bone rig for the skull, since it only had 2 individual pieces. Once rigged, I handed over the Blender file to my teammate so that they could start animating.
I also decided to knock out the standing enemy's projectile while I was already working on smaller tasks for the sprint. What I initially anticipated to be an easy addition, though, turned into a far more nuanced and complicated issue that I needed to fix.


While the wide projectile worked technically, I had considerable trouble making it use a different hitbox other than the base projectile's default sphere collider. I also noticed the projectile's capsule collider inconsistently hit the player while also 'nudging' them in the process, killing the player's momentum. I discussed with our team's designer and producer regarding the need for a more refined projectile system, as tech debt had started to pile up. As soon as they gave me the approval to overhaul the base projectile, I got to work.
My first attempt to improve the base projectile went fairly well. My main approach was to make projectiles perform their hit logic through either overlap events or blocking hit events. These together helped to make the base projectile hit players and enemies more consistently. Physical projectiles no longer tunneled through thin surfaces.

However, there was a glaring issue: projectiles would physically 'nudge' hit entities for a single frame. Even though the projectile's colliders were immediately disabled on blocking hit, the blocking hit itself caused the 'nudge.' I tried making the projectile's overlap only, but that simply reintroduced the tunneling issue from before when projectiles moved too quickly. It became clear that alleviating ourselves from accumulating tech debt would be more challenging than I thought.
Quickly, I discovered a fairly simple solution that ended up making the base projectile more modular and consistent: sweep casts. In Unity, I would frequently give projectiles custom collision detection through sphere casts for the sake of consistency and performance. I realized that I could simply use this same method in Unreal Engine, as the engine had its own version of sphere casting.
After many hours of development (and a poor sleep schedule), I worked the base projectile into a much cleaner and more intuitive state. Now, projectiles and hitscans both make use of the same sweep cast function. Projectiles no longer tunnel through objects and make contact with characters without 'nudging' them around. I was also able to consolidate timer and projectile expiration logic from multiple projectiles inheriting from the base blueprint, allowing the callback events to be used for other things.


My team and only have 4 more weeks to develop our game. With time constraints in mind, I'll be shifting most of my efforts away from gameplay logic towards visual effects and shader work for sprint 6. We have a lot of visual elements in our game that need to be implemented programmatically, and my fairly extensive experience working with graphics programming & node-based visual effect workflows qualifies me for these tasks.
Escape The Devil's Saloon: Sprint 4
October 24, 2025
My fourth sprint working on Escape The Devil's Saloon was spent primarily improving and optimizing many of our game's systems. Midway through, we had the privilege of getting Alisha Thayer's opinion on our game and have started to implement her feedback. I was also able to personally connect with her during an alumni panel she was a part of later that week.
At the start of the sprint, I sat down to organize the folder hierarchy of the game's project files. While we had done a decent job organizing our files up to that point, things started to get cluttered as we continued development without an official folder structuring or file naming conventions. Reorganizing the project at the beginning of the sprint meant that I could rearrange and rename files without impeding on the work of others.
What I anticipated to be a quick task turned into hours of troubleshooting due to a plethora of issues. The main issue I was facing was caused by how Unreal Engine handles moving files in the editor. When a file is moved, a redirection reference is left in its previous location. This redirector tells files referencing the moved file where it was moved to when needed. While it helps to prevent file references from being broken, these redirector files prevent seemingly empty folders from being deleted, making it very difficult to keep a tidy workspace. Forcibly deleting these files was also not an option, as that would simply break file references.
I eventually found how to properly 'apply' redirectors to references pointing at them. This, along with making use of Unreal Engine 5's recommended naming conventions, made the project much easier to navigate for my team and I going forward.


Next, I worked on developing a master shader for most of our in-game assets to use.
Previously, we had made a new material for each individual object. Since materials act as their own shaders, this resulted in our project having considerably more shaders to compile than necessary, which could have potentially caused performance issues on lower end computers. Using material instances deriving from this master shader helps to reduce the number of shaders the game will need to compile, ensuring performance isn't degraded.

With the project's organization and material optimizations complete, I went to work improving the player's weapon and ability equip systems. More specifically, I improved how the player blueprint fetches, equips, and uses its weapons and abilities. This was the final system I implemented before Alisha Thayer reviewed our game.
The system I ended up developing handles equipping weapons, equipping abilities, and activating non-equippable abilities through 3 functions/macros:
The Equipper takes an integer and equips a weapon/ability based on the given index. Negative values represent equippable abilities, starting at -2 (-1 represents no equipped weapons/abilities).
The Toggler enables/disables items in an array based on whether their index matches the given integer. It only updates an item's state if its current state doesn't match its target state.
The Ability User equips/uses an ability based on whether said ability is marked as equippable.
Together, these functions streamline the process of equipping and using weapons and abilities. New weapons/abilities can easily be made without the need for extra functionality to let the player use them.


During the next class period, Alisha Thayer made a special guest appearance. Alisha Thayer is a lead design director at Crystal Dynamics with experience in both game and technical design. She gave each team thorough feedback based on her experience working with large teams. For our game, Alisha advised we focus on refining what we have rather than adding features we planned for later sprints, mentioning how most AAA games cut features or plans due to time constraints. She also advised we pivot our gameplay to centralize more around the lasso, as she found the ability more engaging and unique than mere gunplay.
Her feedback helped us understand what our game needed to succeed. Prioritizing existing features over new ones would ensure that no elements of the game feel unpolished or unfinished. It would also help to minimize the level of work we would need to achieve a minimum viable product. With her feedback in mind, we decided to scrap the High Noon ability and have me pivot to developing the ranged flying enemy.
Developing the ranged flying enemy was rather straightforward. All I needed to do was make a ranged enemy variant had neither gravity nor navigation logic. As I developed this enemy, though, I saw that the existing ranged and melee enemies could share the majority of their functionality through the base enemy class. By migrating their core logic to the base class, newer enemy features (such as being stunned on headshots) could be made without duplicating code across separate blueprints.


For the next sprint, I'm going to fully rig/animate the ranged flying enemy's model and add damage reactions to the base enemy class. I also plan on coordinating the development of VFX with my team, as we want visual effects across our game to adhere to a single style. As we near our final sprints, it's important we prioritize polishing features and avoid working on systems we might not have time to fully implement.
Escape The Devil's Saloon: Sprint 3
October 10, 2025
On my team's third sprint developing this game, I pivoted my focus away from player movement and instead helped my team with the first-person model's display and animations. To be more specific, I worked on implementing proper weapon sway, the rig for the first-person arms, and a couple animations for the revolver. I also fully reworked the player's weapon equip system to be much more robust.
Starting with weapon sway, I actually have a fair bit of experience implementing it from older projects. A couple years ago, I was working on a shooter game with a friend in Unity, and I was in charge of making the code for first-person visuals. It didn't take too long for me to get a good result that I was fairly happy with.
Unfortunately, though, my friend quickly discovered a bug where the intensity of the sway scaled inversely with the player's framerate. If their framerate became low enough, it would start shooting to the sides of the screen. This is because the sway function relied on the current frame's delta time to smoothly interpolate between the current weapon's angle and the target sway angle. While I tried to fix this issue by clamping the maximum angle deviation, the issue never truly went away. Recently, though, I came across a video by Freya Holmér with an intuitive solution to this problem.

With this newfound knowledge, I was able to create a weapon sway system that moved the player's weapon as they rotated their camera that was unaffected by the player's framerate. I also made sure to give it a plethora of other configurable parameters to make fine-tuning it easier.


I'm personally really happy with how the way system came out. It's subtle but still a nice touch to make the game feel more alive and not as stiff.

The player's hand rig and animations were next after I got weapon sway working. While this took considerably longer than the weapon sway, I wouldn't say it was very difficult. It was more tedious if anything, but still nice to do something outside of programming. I started by importing the hand models into Blender, since I personally think Blender's rigging animating workflow is far better than Maya's. After that, I got to work adding bones to the armature and parented the hands mesh to that rig.
Since I used Blender's automatic weights for the mesh. I had to manually go in and edit the vertex weights for each bone to ensure each bone didn't have influence over parts of the model that they shouldn't. The left hand bone shouldn't have any influence on the shirt cuffs, the right index finger bone shouldn't move part of the right middle finger with it, and so on. While I had to manually edit a lot of the inaccurate weights, Blender's automatic weights served as a great starting point for my rig.

Once the rig was fully complete, I took a shot at making a couple of animations for the revolver. I used Brutal Doom's revolver sprite animations as a reference for my animations, as our game is directly inspired by older boomer shooters. For these animations, I made use of a technique Eltorro64Rus suggested for smoothing (insert two keyframes around a key pose, delete original key pose, and move remaining keyframes around) to ensure the animations didn't feel stiff or robotic. I also considered using some of Kommander Karl's 'meme reload' videos for reference, but I didn't end up needing any extra references.
Overall, I'm really happy with how both the rig and animations came out. I also feel like I learned a bit about the process of rigging and animating for first-person perspectives.


For my last card this sprint, I worked on improving the player's weapon equip logic. I was supposed to start the implementation of the High Noon ability, but I wasn't able to due to how the default weapon swap logic worked for our game. Before, the player would press a single button to swap from their currently active weapon to another weapon if they had more than 1 gun. There was no logic that would let the player swap to a specific weapon which I needed to make the High Noon ability.
To remedy this, I spent a considerable amount of time fully revamping how the player controller equips and unequips weapons. It now works through a primary 'Try Equip Weapon' function that takes an index and attempts to equip the weapon at that given index in the weapons list. Since the 'equipped' state of each weapon is simply determined by whether its active, I was able to just toggle each weapon based on whether its index matched the desired index. I also added a check to ensure weapons weren't told to be active or inactive if they already were in that state, as weapons can have unique code execute for when they toggled on or off.


Overall, I'm very satisfied with how much I was able to do for this sprint. While I wasn't able to do much for the High Noon ability, I'm still pleased with the work that I was able to do that will let me develop the ability.
For our next sprint, I plan on fully developing the High Noon ability and continue to rig more meshes for our game. More specifically, I'll be rigging the flying skull enemy and the melee enemy so that they can be animated later.
Escape The Devil's Saloon: Sprint 2
September 27, 2025
For our second sprint working on Escape the Devil's Saloon, I focused the majority of my time implementing the movement mechanics we planned on having for the player. The goal here was to make a movement system that was both easy to control with a high skill ceiling for more advanced techniques. To accomplish this, I implemented the rest of the movement features my team planned for me to develop: wall jumping, dashing, and air strafing.
The main challenge I faced during the development of these features was making them in a way that wouldn't interfere with one another. I had to make sure each movement feature would play nicely with one another as well as handle potential abrupt state changes during play. To ensure compatibility between features, I designed the majority of them on top of the already present character movement component. This allowed many of the same features to plug in to the character moment's variables and functions without causing any severe conflicts between systems.
For wall jumping, I decided to adjust the current jump's code rather than make it separately. This allowed me to use the jump buffer that I made for both wall jumps and ground jumps, dramatically improving how it felt to use. The wall jump works by sending out a capsule cast in the direction that the player is trying to move. If this capsule hits a surface, the player's y velocity will be set to at least the wall jump velocity, and a push force will also be applied to the player away from the wall. Applying the max() function to the player's y velocity rather than a simple impulse allows the player to 'catch' themselves when falling from large heights, making the wall jump feel more consistent.

The player's dash took a bit more work than I had originally anticipated. Since I wanted the movement mechanics to play nicely with one another, it wouldn't have been feasible to make it work exactly like ULTRAKILL or Valorant, where a temporary velocity is directly applied and then reset after a short duration. I had to come up with a system that could emulate these dash systems without impeding on other means of movement.
The solution I found was simple but very effective. The dash applies a launch velocity in the direction they're trying to move with a slight upwards force. This was coupled with a timeline that would momentarily disable the player's gravity and friction. The launch force coupled with gravity and friction reductions resulted in a dash that still has that 'go-and-stop' feel on the ground without impeding other movement systems. I also made the dash's speed scale with the player's velocity, so you could use it to 'redirect' your speed towards a single direction.


Out of all the movement systems, I would say the air strafing took the longest to create. Since Unreal Engine's default character movement was more rudimentary than anticipated, I had to make my own solution from scratch. While this was a headache at times to bug test and tune, I ended up with a system I'm very happy with.
Originally, I had actually implemented Quake's air acceleration function in the player's blueprint. I was able to find this online and convert it into blueprint code. Surprisingly, it worked really well without much modification. Unfortunately, though, it did not play nicely with the other movement features and fixing that would have been more trouble that it would have been worth since Quake's air strafing was in more of a bug rather than a feature.
Instead, I implemented my own system inspired by Quake's function. This system takes the dot product between the player's movement direction and target movement direction and 'rotates' the player's velocity towards the target direction based on that dot product. This custom solution was much simpler than Quake's implementation, was easier to fine tune, and played nicely with the other movement features.

For our next sprint, I'll be pivoting away from player movement and work on some animation systems and the High Noon ability. This ability will slow the game down and let you shoot enemies one by one during this 'bullet time' effect. It will likely take most of my next sprint to develop, but I might also work on improving our tutorial level if I have the time.
Overall, I am really proud of how far my team and I have come with this project. Even though it's only been 2 sprints of work, I think our game is really coming together nicely, and I am very excited to see where were take it next.
Escape The Devil's Saloon: Sprint 1
September 13, 2025
In my CAGD 470 class, the main assignment for the semester was to fully produce a game in the game engine of our choice. We were expected to create a treatment document, set up version control software, make use of Jira for our sprints, and reflect each week on what our team did well and what we could do better.
To determine teams and what game each team would be producing, we were required to create a 2-slide pitch that had both a game pitch of our own and a resume of our previous work. For my pitch, I came up with a brawler-type mech game where you defeat enemies in a giant tube and use their corpses to fill it to the brim. I didn't plan on actually producing my pitch into a game, but I still wanted it to sound and look nice to the class. I also made sure to demonstrate all of my previous experience developing my games on the portfolio slide, as I wanted people to see how I was an experienced developer.


After everyone presented, the teacher divided us into the 4 corners of the room based on preferred role: Producers, game designers, programmers, and modelers/texturers. I had already planned to work with a friend of mine who also had a lot of experience with game development, so we directly paired up along with 3 other individuals we knew we could trust.
Our game was a western boomer shooter called Escape The Devil's Saloon. In this game, you're sent to hell after losing a game of poker with the Devil. You must shoot, slide, and jump through waves of enemies and fortified locations to escape the Devil's grasp.
Once teams were arranged, the producer and game designer got to work creating a treatment and cards for the Jira board. Our modeler, UI artist, and I (programmer) were given smaller tasks to ensure we could still be productive while the game documents were being fleshed out.
While the game design document was being worked on, I got to work setting up the GitHub and making the project in Unreal Engine 5.6. I put a fair bit of time into optimizing the engine's parameters to ensure the game ran well on lower end hardware. Some optimizations I implemented include switching to the forward renderer, disabling Lumen and Nanite, disabling unnecessary post process effects, and tuning shadows to be a bit lower resolution without compromising visuals.

After the GitHub and engine parameters were set up, I got to work on the character's movement. We used Unreal Engine's base shooter template to start with, which helped negate the need to make a lot of boilerplate code. I was able to get the base movement very similar to that of Ultrakill, which has snappy controls with smooth aerial movement. This would serve as a platform in which I could continually add additional movement features, like sliding and wall jumps.

Once the movement was in a good state, I then went to work on the sliding system. Sliding seemed like it would be easy to implement at first, but I had a fair few issues here and there during development. A big issue I was facing was how to prevent the player from sliding in the air. It would have been a bit awkward if the player could just slide and redirect themselves across the sky, so it was important that I prevented the player from sliding while in the air. However, I let the player continue sliding off ledges to prevent the camera from jerking around.

While a bit hectic, this first sprint went pretty well for us as a team. Most of us aren't very experienced with Unreal Engine 5, but it's thankfully fairly easy to learn and use. For our next sprint, I will be working on letting the player jump off of walls. This will be highly configurable with parameters for the wall jump's up force, away from wall force, and total wall jumps before landing. I also plan on implementing dashing, which will give players a moment an invulnerability frame later in development.


