Blog: New Clairvaux Vineyard Tour App
- Jack Stevenson
- Mar 29
- 11 min read

Updated: Apr 27
New Clairvaux Vineyard: Sprint 4
April 26, 2026
For our 4th sprint, I continued to refine our app's user interface using the UI Toolkit and C# scripts. I placed and filled in POIs on the map, created confirmation windows and information screens for the POIs, and made dynamic POI icons that display their respective id and change color when completed. I also better integrated Chase's AI model into the app's UX workflow, allowing successful scans to automatically complete
To start the sprint, I worked on adding all 18 of the POIs we had planned onto the map. Chase already created a scriptable object class to represent each POI and a script to populate the map with them, so I started making scriptable objects for each POI. Once all of the POIs were placed into the Settings scriptable object Chase also made, the map was automatically populated with 18 different icons.


However, I noticed that the POIs were slightly offset from where I expected them to be. I tried to manually adjust their locations but quickly realized that the POIs didn't scale with the map's size. They instead remained at fixed locations, resulting in the points not aligning on different sized screens.
To fix this, I gave the POIData script two properties that converted the SpawnPosition vector from an absolute location to a percentage-based one relative to a 1080x1920 screen. This meant that the UI icon's location would be a percentage of whatever it was parented to, ensuring it stays in the same relative spot on the map regardless of its size or scaling.


The following day, I had to go to the vineyard along with some other teammates. We scheduled a meeting time so that we could get pictures for each of the stops for the AI model to be trained on. While we were unable to get all of the pictures we needed, we got more than enough for Chase to start training the AI model on.
When we returned, I continued working on the POI system. My producer and lead designer determined it would be a good idea for there to be a confirmation window when selecting a POI. This would ensure that people aren't immediately thrown into the scanning mode if they accidentally click the wrong POI.
I did this by creating a new Confirm Prompt class. The class automatically binds its delegate-calling methods to each of its UI prompt's buttons. Other scripts only need to bind their logic to the class's delegates instead of needing to search for the buttons in the UI element. The POUIService, for example, binds the scanner starting function to the Confirm Prompt's OnConfirm delegate.


With the confirmation window done, made an improved sticker reward menu for when the user successfully scans the active POI. Since the POIUIService holds a publicly accessible reference to the currently active POI, all I needed to do was make the scanner's UI service set the sticker reward menu's data source to the active POI.
I also added a scroll box to the sticker reward menu's detailed description segment. These segments will be displaying a lot of information that users will want to read through, so it's important that they're able to read the text comfortably. I plan on changing the scroll view to a page-base system to further enhance the UI's feel.


Midway through the sprint, my team and I once again went to the vineyard to take more pictures. Before the first trip, we expected that we would need to visit the site more than once to get all of the pictures needed for the project. We mainly focused on taking images and videos of the areas we weren't able to get on our first trip, while also taking extra pictures of POIs that didn't have enough pictures from last time.
With the expanded library of pictures for our AI model to be trained on, Chase was able to train t a working model on 2 of the stops: the Sacred Stones and the Winery Entrance. Not only did the model reliably scan each object, but it also had no issue distinguishing the different POIs from one another. This would allow the app to not act on false positives in case the scanner picks up the wrong POI.
Integrating Chase's new scanner into the UI was fairly trivial. His clean codebase made it easy for me to understand how the scanner's UI service should plug into the scanner. He also made the scanner service automatically highlight detected objects, helping the user see what needs to be focused on. We plan on making the scanner require multiple successful scans to further protect the app from false positives and so the app can feel smoother. It will be similar to how Apple implemented ZoomRects for smoothly opening tabs to prevent jarring pop-ins.

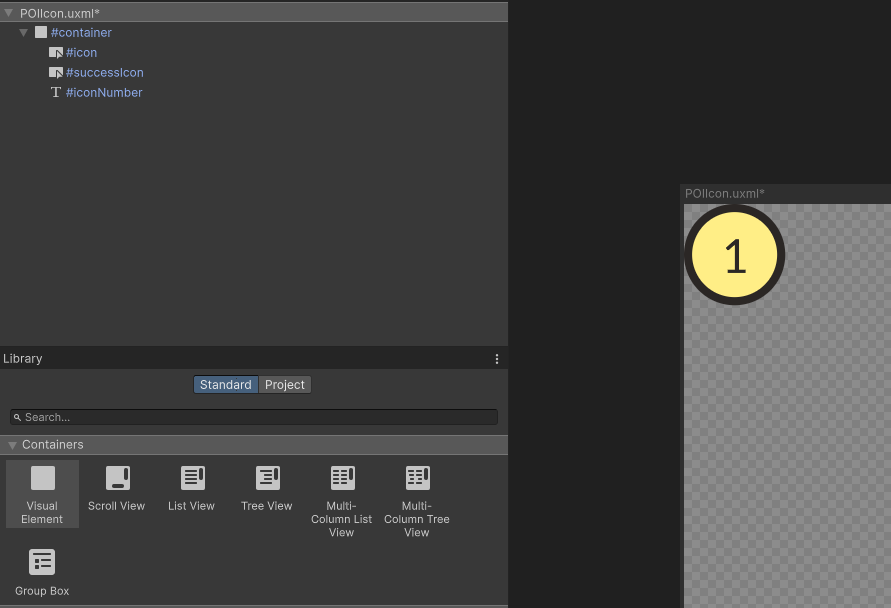
Finally, I improved the POI icon that is displayed on the map. My team's producer and lead designer went to demonstrate the app to representatives for the New Clairvaux Vineyard on-site. They really liked how the app could bring in younger tech-savvy individuals who would be intrigued by the app's AI-powered systems. However, they suggested that the POIs be made larger on the map, since they were both small and hard to press.
I fixed this by turning the POI's icons into dynamic circular buttons. These buttons automatically display the index of the POI, making them easier to distinguish. They also change colors when their associated POI is completed. Together, these improvements make the map much easier for users to read and interact with.

Since our next sprint will be our last, I will be dedicating my time to polishing the features already in the app, as well as add the sticker library. I plan on overhauling the color palate and font scheme to fit the style made by our research team to ensure we have a visually cohesive UI. I'm really proud of all the work my team and I have pulled off so far, and I'm excited to see how we end things off.
New Clairvaux Vineyard: Sprint 3
April 12, 2026
For our 3rd sprint, I started to help develop our app's UI functionality through Unity's UI Toolkit. I implemented the permissions popup screen and the activity popup screen. I also created a custom WebGL Template for our build so that the app automatically encompasses the whole screen.
Before working on anything else, I took the time to learn about Unity's UI Toolkit. Previously, I had only used Unity's uGUI for developing user interfaces. My team decided to use UI Toolkit due to how it was considerably more robust and performant than the former. It was also more adjacent to actual web development, since it uses a custom language based on HTML and XML.
After watching a few videos and looking over the code one of our programmers, Chase, had already written, I got a good understanding of how to use the workflow. Similarly to how he did it, I separated the logic and UI scripts into 2 separate classes. This made it much easier for me to develop a service's UI without needing to modify the service itself.
The first UI element I created this way was the permissions window. This window simply informs the user that they need to give the app permissions in order to function. If permissions are granted, the popup will go away. If permissions are denied, a new popup will display, telling the user how they can get the prompt to reappear.
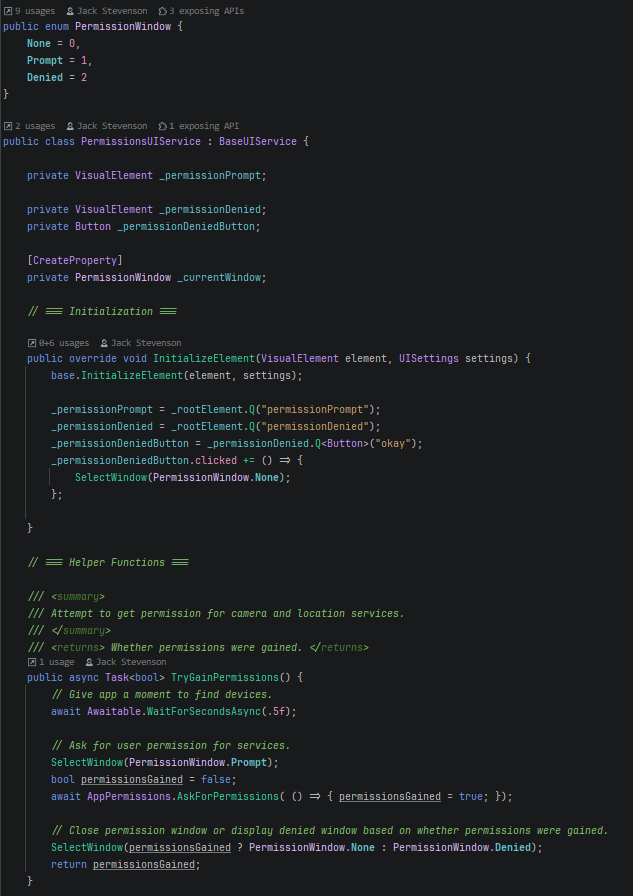
I also separated the permission logic from the UI service into its own script, ensuring that the two can exist separately while still communicating with one another when necessary.

Combined, the two scripts allow the program to both inform the user about the need for app permissions and request said permissions from the user. The two scripts being separate will make additional UI functionality or extended permission requests much easier to implement.

With the first UI element done, I decided to focus my efforts on an issue I'd noticed with previous builds. When the app launched in a browser, the screen size would only cover a portion of the screen. Even though Unity's default WebGL templates have a button that expands the app, it felt unintuitive to press this button each time the app was loaded, especially on mobile devices. To remedy this issue, I made a custom WebGL template for our app to use.
Creating this template was considerably easier than I expected it to be. All I needed to do was copy/paste Unity's 'Minimal' default template from the editor installation into the project, then rename it to something more fitting.

To make the app automatically stretch to fit the entire window, I had to do some digging online. My experiences with JavaScript and HTML were very limited prior to this project, so I needed to look online for help. I quickly found other people who had this issue and was able to edit my template in accordance with their proposed solutions.

While looking for a solution, I also saw that I could put my permission plugin's code into this html file. This meant that I no longer needed to use the JavaScript plugin I made previously, making my C# code a bit lighter. Preemptively requesting the media through the HTML file also proved to be considerably more reliable than the plugin for one reason or another.

After I got the WebGL template in a good spot, I continued working on UI functionality. I used my newfound UI Toolkit knowledge to turn the Webcam test script I made previously into a proper UI display. This would allow me to continue the rest of my UI work through this workflow, as I was previously using Unity's uGUI.
I created a separate script for the webcam's UI functionality. This script simply waited for the user to give the app permissions for the camera to then display a webcam texture if said permissions were granted.

Like I had done with the permission system, I kept the webcam's logic in its own script separately. This was especially important, since Chase was starting to implement the backend for our AI model that our app would use to scan objects. This model would need access to the webcam's feed, which it would get from a designated webcam texture. Having the webcam service as a separate script means the AI model won't interfere with the webcam's UI display when the model starts a scan.

Finally, Chase, our other programmer (Jacob) and I took the remaining time we had in our sprint to compile a build. Since we didn't have the image data needed to train a proper model on the scannable objects at the New Clairvaux Vineyard, we instead used a pre-trained AI model to ensure that Chase's backend worked with the work Jacob and I had done.
After some trial and error, we got the model to work. The webapp's performance on my lower-power Android phone wasn't great with the scanning feature running, but it was doing scans without issue beyond that. Since the test model we used was trained on hundreds of thousands of different images, we were able to successfully scan a bunch of things around our houses. I was even able to scan my cat!

For the next sprint, I'll continue to develop the remaining UI scripts and systems necessary for our app to properly function. Chase, Jacob, and I will take a plethora of videos and pictures on-site so that Chase can start training a custom AI model. I'll also start to polish the look and feel of our app, since the final deadline for our app is approaching.
New Clairvaux Vineyard: Sprint 2
March 29, 2026
For sprint 2, I worked on finding a way for us to test a built version of our web app on our phones. I also developed a system that let the app access the user's phone camera through a UI prompt. This permissions system ended up requiring the creation of a specialized plugin to ensure consistent behavior between iOS and Android devices.
To start, I needed to figure out how to properly request webcam access in Unity. This was my first time using webcam footage in a Unity project, but the general pipeline was easy for me to understand. To use a webcam through a web app, Unity requires you to first request for the user's permission to use the webcam. I wrote the AskForPermission function as an Awaitable so that scripts could asynchronously wait for the user to give the app permission without stalling the entire app.

When permissions are granted by the user, Unity allows you to access the feed through WebCamTextures. These behave similarly to RenderTextures, but they instead get their input from a physical device camera rather than a virtual one. Since devices can have multiple physical cameras, Unity gives you a list of each accessible camera that WebCamTextures can use.
For this web app, we needed access to the back/environment camera. Each device has a bool indicating whether the device is a front facing camera, which makes it easy for the program to simply filter for the first WebCamDevice that isn't forward facing.

Once the WebCamTexture is created and started, it can be assigned to a material or sprite to be displayed in the engine. For testing purposes, I had it display on a rectangular plane. This worked well enough to show that the app could read and display the webcam's feed.

While I got the webcam to work on my pc, I needed to discover how I could deploy a development build of our app to some sort of hosting platform, since having the app hosted online would allow mobile devices to access and test it. This would make the process of finding and fixing platform-specific bugs much easier.

I initially tried to use itch.io for deploying these test builds, since I previously had success using it to deploy web games. However, itch.io seemed to block any attempts from the web app to access user input devices. I also tried to host the web app locally on my Android phone, but I soon learned that Android and iOS phones only let websites connected through https links to access cameras for security reasons.
After some more digging, I ended up settling with GitHub for the test deployments. All I needed to do was turn the built web app into a GitHub repository, publish it, and deploy the main branch as a website through the GitHub Pages tab online. This allowed the web app to properly request access to webcams while running through a https link, allowing it to run without issue.


With the app hosted, I was able to ensure that it worked on both iOS and Android devices. However, I noticed that the web app could only access the front-facing camera on my Android device. The back facing camera would always show as black and report as not being updated.
After some research, I discovered that Android only lets web apps use one webcam device per session due to stricter security policies. Unity would, by default, access the first webcam it could find. It would find the front facing camera each time and thus block access to the back facing camera for Android devices.
I figured out that I could override this functionality by making a JavaScript plugin to specifically request the back camera exclusively. This would ensure that the back facing camera would always be accessible to the app on Android devices. After developing and integrating a simple plugin into the app, it worked flawlessly on multiple browsers across both Android and iOS devices.

For this sprint, I was able to set up the groundwork for the development of later features. During the next sprint, I will be working on developing proper UI functionality for the app, such as the badge tracker and notifications for when the correct object is scanned. I'll also coordinate with one of my team's other programmers to properly integrate object detection.


